Basic Russian T-tunic Pattern

by Lady Sofya la Rus, Mka Lisa Kies
inspired by a class given by
HL Seraphima Iaroslavna [sic]

This pattern can be modified to make almost any Russian garment. Rightly or wrongly. Drawings are not to scale.

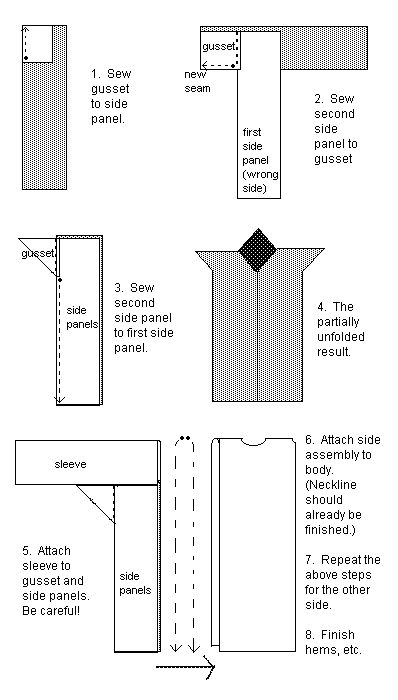
Putting together the tunic.
Making the tunic pattern

Warning: These instructions do not provide for seam allowances, hems, etc.

Materials:

  • dressmaker's tape measure
  • pencil and pen
  • calculator (or abacus)
  • yard stick and other ruler
  • graph paper
  • paper or other material to make patterns (unused patterns from garage sales or Goodwill work great)
  • muslin or other inexpensive fabric to make a mock-up to check your work
  • Measurements:
  • Back of neck to ankle (female) or knee (male) - determines length of body piece.
  • Shoulder width - determines width of body piece.
  • Circumference of base of neck - determines size of round opening in body piece.
  • Head circumference - guides depth of neck slash.
  • Arm length - minimum length of sleeve.
  • "Wrist" circumference - actually need to measure around hand between wrist and knuckles.
  • Shoulder circumference - probably easiest to measure around the shoulder opening of a shirt that fits you.
  • Height from armpit to knee/ankle - determines length of side panel.
  • Chest circumference - measure at widest point.
  • Waist circumference - measure where you would wear a belt and, if you have a significant spare tire or a bun in the oven, around the widest point.
  • Hip circumference - measure at the widest point around your butt.
  • Height - your full height head to toe.
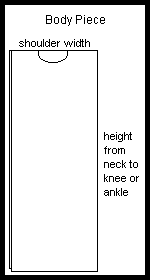
  • Body piece:

    Go ahead and make up this piece full scale on your pattern paper.

    It's based on a simple rectangle. Its width is equal to your shoulder width. Its length is two times the distance from the back of your neck to where you want the hem, ankle or knee.

    You could also make it in two pieces if your fabric is too short. The length is halved in that case, of course.

    Neck opening - you'll have to fiddle with this a bit.

    You can use your tape measure to lay out a rough oval or circle of the necessary size to fit close around the base of your neck, then smooth it out and make it symmetrical.

    Then make a slash down the middle front long enough so you can actually get your head through the hole.

    The slash length ends up to be about equal to the head circumference minus the circumference of the circular hole. More or less.

    Gusset: this piece is completely optional, but I recommend using it. This is a simple square, 3-5 inches on a side (8-13 cm), depending on how big you are. I don't think the size matters as much for the fit of the garment as for the proportion. I might be wrong.
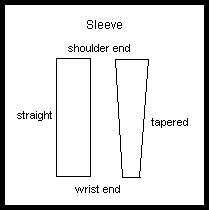
    Sleeve: Can be cut straight or tapered.
    The width of the sleeve pattern at the wrist should be at least big enough to slip over the hand without too much trouble. The distance around your relaxed hand about halfway between your wrist and your knuckles should be about right. Make a circle out of non-stretchy string to double check if you want.

    If you want to be able to push your sleeves up to work or stay cool, you'll need to make the wrist end bigger of course.

    The width of the sleeve pattern at the shoulder should be based on the distance around the armhole of a shirt that you like.

    The length of the sleeve needs to be at least as long as your arm, obviously, plus a couple of inches so the sleeve doesn't pull up too high when you bend your arms.

    Bear in mind, however, that the Rus tended to have sleeves at least long enough to pull over their hands for warmth instead of mittens. Even longer gives a wonderfully luxurious gathering of fabric on the arms when you push the sleeves back to the wrist. I like my sleeves long if you couldn't tell.

    This will also have some bearing on the width of the sleeve at the wrist. If it's very wide, and the sleeve is extra long, you'll need a bracelet or zarukavya/cuff to keep your sleeves up around your wrists. (These are standard accessories for the Rus.)

    Sketch this pattern piece to scale on graph paper before transferring to your pattern paper to double check the layout. Make sure that there aren't any sections of your arm that are too big for the equivalent part of the pattern. This shouldn't be a problem unless, maybe, you're a body builder or something.

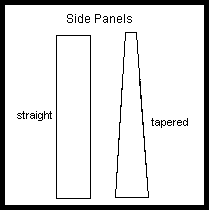
    Side panels: can be cut straight or tapered. Length of side panel roughly equals the distance from your armpit to where you want the hem.

    Width of top of side panel needs to at least equal the circumference of your chest (plus a couple of inches for ease) minus two times the width of the body piece, all divided by four (because there are four side panels.

    width = [(chest + 3) - (2 x body pattern)] / 4

    If you're doing straight side panels, the width of the top would be greater than this, i.e. equal to the width of the bottom.

    Width of bottom of side panel should equal, more or less, your full height minus two times the width of the body, all divided by four. (Your stride length is approximately equal to your height.)

    width = [(height) - (2 x body pattern width)] / 4

    Sketch out the pattern to scale on graph paper. Use a ruler. ;)

    Check on the graph paper the width of the pattern at the level of your hips and/or waist to make sure it's big enough. (Measure down from the armpit to determine the level of waist/hips.) If your chest is bigger than your hips/waist (or you're doing straight side panels), consider yourself blessed and don't worry about this step.

    width = [(hip/waist) - 2 x body pattern width)] / 4

    Make the necessary adjustments by making the bottom wider (for more flared look), the top wider (more straight fit), or widen both ends.

    Double check everything.

    Transfer to your pattern paper.

    Make an example of the garment out of your inexpensive fabric and make final adjustments to your pattern.


    Send comments or questions to lkies@jumpgate.net
    Return to Russian Materials.